Repairing cigarette burns on a wood tabletop means you remove damaged fibers and finish, rebuild the surface in thin layers, then refinish so the spot blends in. You learn which marks are a surface scorch and which are true holes that change the wood’s texture.
You will see what you can fix at home and when to call a pro for refinish or a patch piece. Small finish scuffs often respond to simple sanding and stain touch-ups. Deep holes need filling or a thin patch before sealing.
The article previews a clear process: assess the damage, prep clean edges, repair by depth with filler or patch, color-match, then reseal. Patience matters; rushing sanding or dry times creates a sunken or soft spot that shows under a new topcoat.
You follow short, present-tense, second-person steps so you move from diagnosis to a durable repair without guesswork. Aim to blend edges and sheen with the surrounding finish for a seamless result—the best way to hide a cigarette burn.
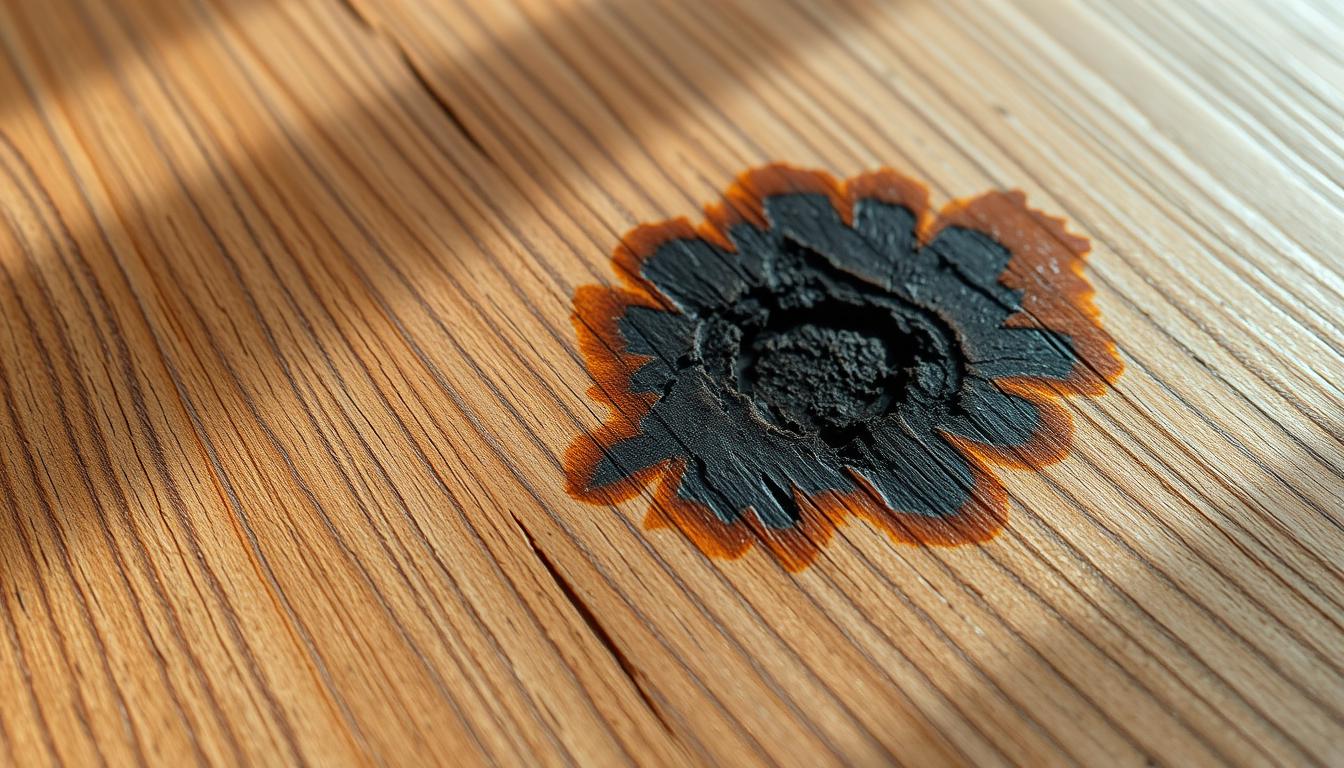
Assess the Cigarette Burn Area on Your Wood Tabletop
Begin your inspection under strong light so you can spot whether the mark is only on the finish or into the wood. Use a magnifier or a close view to map the full area before you touch it.
Surface scorch vs. a true burn hole
Surface scorch usually sits flat and looks like discoloration. A true hole shows a depression, crumbly charcoal, or missing material. If the damage fully penetrates, treat it as a burn hole that may need backing support behind the opening.
Check edges, texture changes, and finish discoloration
Run a fingertip around the mark to feel the texture. Look for brittle, lifted finish or jagged char at the edges. Note where the surrounding finish returns to normal so you only work inside the affected area.
Decide: spot-repair or patch piece
- If the damaged area is shallow, a spot fix can level and blend the surface.
- If the hole is deep, wide, or crosses grain, plan a structured fill or a patch piece for lasting stability.
- Accurate assessment now makes the final blend less obvious.

Prep Work That Makes Repairing Cigarette Burns Last
Start by setting up a clean, stable workspace so you can trim and clean the damaged area without spreading soot. Lay down paper or a drop cloth and gather a small set of tools and a soft cloth nearby.
Trim loose material. Use a sharp, small tool or pointed tweezers to remove only singed, crumbly fibers until you reach firm wood. Work in a controlled way and remove a small amount at a time so you don’t widen the spot.
Clean before you bond. Wipe the area with a lint-free cloth and an appropriate cleaner to remove soot, oils, and sanding dust. Good cleaning helps glue and filler adhere instead of sitting on contamination.
Let the surface dry fully before the next step. Mask the surrounding finish to protect it and define a smooth edge you can blend. A clear transition now makes color matching and topcoating much easier.
- Keep tools and a clean cloth within reach so you can alternate trimming and cleaning without spreading debris across the tabletop.
- Think of this prep as the make-or-break step—any leftover char will cause a failed or sunken repair.

Repairing Cigarette Burns on a Wood Tabletop by Damage Depth
Match your repair method to how deep the mark is so you choose the right materials and avoid extra work. The goal is a stable, level result that accepts color and topcoat without a visible halo.
Fixing a shallow mark with light leveling
For a shallow spot, lightly sand to remove loose finish and lift. Apply thin layers of a furniture filler or kit, letting each set before the next coat.
Build small amounts so the surface does not sink. Trim and sand gently between coats until the area is flush.
Filling a deeper hole with a stable base
Deep damage needs a firm base so the center won’t keep sinking. Fill the bottom with a stable material, then add controlled thin layers until the repair sits slightly proud for final leveling.
Use a clamp or a flat object with protection to hold a patch flat while the glue cures, only when appropriate.
Backing material or patch for through-damage
For a through opening, insert a backing material behind the hole that overlaps under the edges. This supports the fill and prevents collapse.
Then rebuild from the top in thin passes so the patch bonds into a single, solid repair piece.
Glue application and dry-time tips
Apply glue from the outer edge toward the center to avoid trapped air and gaps. Follow manufacturer dry times—wait meaningful cure between steps (for example, let glue set 20 minutes and allow full cure up to 24 hours when needed).
Technique beats brand: a small repair kit helps color and consistency, but layering, pressure, and patience make the fix last.
- Step 1: Match depth to technique.
- Step 2: Build thin layers; let each cure.
- Step 3: Use backing or patch for through-damage, then finish level.
When fully cured and level, the area is ready for color-matching and a new topcoat that blends seamlessly with the tabletop.
Color-Match and Refinish for a Flawless Finish
Work the tone and texture first so the repaired area reads like the original surface. Match color before you seal because a topcoat locks tone in place and makes later corrections hard.
Test your color in small, controlled passes. Apply thin coats and let each dry so you can judge the true hue. Build the color slowly rather than going dark in one step.
Recreate grain and texture with light strokes, a fine brush, or a micro-scratch tool that follows the wood pattern. Concentrate at the edge transitions so the repair doesn’t telegraph under changing light.
Final layering and sealing
Feather both color and clear coats outward from the patch to avoid a sharp ring. If you use a repair kit, mix and test the material on scrap before you touch the tabletop.
- Tip: Some species are harder to match; patient layering usually gets you close.
- Protect: Choose a compatible top layer to unify sheen and protect the area from future wear.
- Analogy: Like seat or upholstery work, matching tone, pattern, and sheen is the key to a near-invisible repair.
Conclusion
Conclusion
Finish by letting all layers fully cure, then inspect under good light. Your core workflow was: assess the mark, prep clean edges, match repair depth with stable layering or a patch, then color-match and seal for lasting protection.
The key to success is patience—do not rush dry times so the repair does not sink, stay soft, or show a sheen mismatch later.
If damage is extensive or the finish is complex, hire a pro for a consistent refinish. Pros can be costly; a DIY kit often costs under $20, but it still needs methodical steps and several hours of work.
These same steps apply in a car interior too, where small holes happen. Protect the surface after repair with coasters, trays, or heat barriers and keep finish notes and color swatches for future touch-ups.


